Something upon which my wider IBM Z team have been working this past few months ....
Announcing IBM Cloud Hyper Protect Virtual Servers – BETA
YouTube - IBM Cloud Hyper Protect Virtual Servers
IBM Cloud Catalog - Hyper Protect Virtual Servers
Hyper protect line of virtual servers service leveraging the unparalleled security and reliability of Secure Service Containers on IBM Z.
Security
Ability to deploy a Virtual Server in a Secure Service Container ensuring confidentiality of data and code running within the VS
Z Capabilities on the cloud
Ability to deploy workload into the most secure, highly performant, Linux virtual server with extreme vertical scale
Easy to use, open, and flexible
User experience at parity with market leaders both when buying and using the VS; with the openness and flexibility of a public cloud
No Z skills required
Access Z technology without having to purchase, install, and maintain unique hardware
Can you say "Yay" ??
Friday, 30 August 2019
Saturday, 17 August 2019
Ubuntu and Docker - Handling the GUI
Long story very short, I've been building some Docker images from an existing parent image.
As part of my build, I wanted to ensure that the resulting Ubuntu OS was as up-to-date as possible, so I included: -
RUN apt-get update && apt-get upgrade -y
As part of my build, I wanted to ensure that the resulting Ubuntu OS was as up-to-date as possible, so I included: -
RUN apt-get update && apt-get upgrade -y
in my Dockerfile as good practice.
However, some of the apt-get upgrade steps involve the debconf tool being invoked "under the covers" which requires CLI interaction, via a very minimal GUI.
This doesn't work too well during a docker build, whether performed manually or, as I do, via a Jenkins Pipeline.
Therefore, I had to find a way to suppress the CLI/GUI interactions.
After some digging, via Google ( of course ), I found this: -
...
If Dockerfile specify the following line, the error will disappear:
ENV DEBIAN_FRONTEND=noninteractive
...
so I tried adding that line: -
ENV DEBIAN_FRONTEND=noninteractive
to my Dockerfile, immediately after the FROM statement.
Guess what ? It worked !
Another one bites the dust .....
Tuesday, 13 August 2019
Python Learnings #2 - handling indices from YAML
I was seeing this: -
TypeError: string indices must be integers
whilst processing a list of data in Python, where said data was being read from a YAML file.
It took me a while to work out the problem/solution.
Long story very short, lists in YAML are different to key/value pairs in that lists do NOT have a key, but instead have an index.
Therefore, the YAML needs to look like: -
number:
- 1
- 2
- 3
or: -
name:
- Lisa
- Marge
- Bart
- Homer
Once I changed my YAML, we were good to go.
These also helped: -
Python Learnings #1 - decoding Base64 strings
Long story short, I was seeing exceptions such as this: -
UnicodeDecodeError: 'utf-8' codec can't decode byte 0xb2 in position 0: invalid start byte
Traceback (most recent call last):
File "decode.py", line 8, in
decoded_string = base64.b64decode(string).decode('UTF-8')UnicodeDecodeError: 'utf-8' codec can't decode byte 0xb2 in position 0: invalid start byte
and: -
Traceback (most recent call last):
File "decode.py", line 8, in
decoded_string = base64.b64decode(string).decode('UTF-8')
UnicodeDecodeError: 'utf-8' codec can't decode byte 0xb0 in position 25: invalid start byte
with a piece of inherited Python code.
I wasn't 100% clear how the decoder was being used, apart from this: -----
decoded_string = base64.b64decode(string).decode('UTF-8')
where string contained, I assume, Base64 encoded string.
The actual string was a public key, generated using openssl : -
ssh-keygen -t rsa -b 4096 -f ~/.ssh/dummy -N ""
I wrote a test harness to simulate the problem and test potential solutions, and was posting the public key to the string variable: -
cat ~/.ssh/dummy.pub | awk '{print $2}'
AAAAB3NzaC1yc2EAAAADAQABAAACAQDXmbB7kUK4G0Fqm+5SSDztAMR5mV+0irWGLFuZN7Pbj30Kyi67TZ3J1cEhC3PsDyFW4hkvMRpdOoSlUfL2yVb1IxvbidcPF0ihtHgnMD2pn3W8xwFpbutpPWUgPd679Yq1C/bzFx2lIDWBpy5bSj/TpTWRsdFy7Z1Esja2ST8RfUByAl5zsg6fuyFFySzY8bVgH/Oc+eS82tICS1ZqdXJy6atsJQ2OnP7zTrw4Txz+vwpmQeddWSjL1wUs77ea0FJjU2MMFHm6+uW+cAr2woYlA4Lac6d+Mq9t5Ibt77J8BijkjJ+U79JhNSky0A2rSeThdWuD7uW/Kju43m6fb5ss/ATKbra/M3hUPg0F0YwtiDmPratCkE11uJnFfyYaPpt58LrgvYZzosliQe96AeCWru6IzEkGoGErSfl/PwielDWzDWXuNxY00gQ0Rtx3I76g6gV01gbxKcBusLTFh51GC0PvVEikhk5cI+drbT1uMDjLHi6Tr2MO+uRdu2BpwVQIZgSUke3OpnjQ2rDTIcaKy6e5lfJ7Hpw0kIw0Bi9j9YDMod90TRQXdElWFKeKQ+ZlaH9Ytr2FeDk+9H69kf52rXtn8q9Uy/NtlIdKsYa2pGdv7N1IFumGX+GbYplewTta/05OaJXI3iia1CV09oFryag+5MYQmJRCijSlUBIFjQ==
Can you see where I was going wrong ?
Yes, the public key is NOT Base64 encoded ....
The solution was to encode the public key: -
cat ~/.ssh/dummy.pub | awk '{print $2}' | base64
QUFBQUIzTnphQzF5YzJFQUFBQURBUUFCQUFBQ0FRRFhtYkI3a1VLNEcwRnFtKzVTU0R6dEFNUjVtViswaXJXR0xGdVpON1BiajMwS3lpNjdUWjNKMWNFaEMzUHNEeUZXNGhrdk1ScGRPb1NsVWZMMnlWYjFJeHZiaWRjUEYwaWh0SGduTUQycG4zVzh4d0ZwYnV0cFBXVWdQZDY3OVlxMUMvYnpGeDJsSURXQnB5NWJTai9UcFRXUnNkRnk3WjFFc2phMlNUOFJmVUJ5QWw1enNnNmZ1eUZGeVN6WThiVmdIL09jK2VTODJ0SUNTMVpxZFhKeTZhdHNKUTJPblA3elRydzRUeHordndwbVFlZGRXU2pMMXdVczc3ZWEwRkpqVTJNTUZIbTYrdVcrY0FyMndvWWxBNExhYzZkK01xOXQ1SWJ0NzdKOEJpamtqSitVNzlKaE5Ta3kwQTJyU2VUaGRXdUQ3dVcvS2p1NDNtNmZiNXNzL0FUS2JyYS9NM2hVUGcwRjBZd3RpRG1QcmF0Q2tFMTF1Sm5GZnlZYVBwdDU4THJndllaem9zbGlRZTk2QWVDV3J1Nkl6RWtHb0dFclNmbC9Qd2llbERXekRXWHVOeFkwMGdRMFJ0eDNJNzZnNmdWMDFnYnhLY0J1c0xURmg1MUdDMFB2VkVpa2hrNWNJK2RyYlQxdU1EakxIaTZUcjJNTyt1UmR1MkJwd1ZRSVpnU1VrZTNPcG5qUTJyRFRJY2FLeTZlNWxmSjdIcHcwa0l3MEJpOWo5WURNb2Q5MFRSUVhkRWxXRktlS1ErWmxhSDlZdHIyRmVEays5SDY5a2Y1MnJYdG44cTlVeS9OdGxJZEtzWWEycEdkdjdOMUlGdW1HWCtHYllwbGV3VHRhLzA1T2FKWEkzaWlhMUNWMDlvRnJ5YWcrNU1ZUW1KUkNpalNsVUJJRmpRPT0K
at which point my code started working: -
python3 decode.py
which returns the original unencoded public key: -
AAAAB3NzaC1yc2EAAAADAQABAAACAQDXmbB7kUK4G0Fqm+5SSDztAMR5mV+0irWGLFuZN7Pbj30Kyi67TZ3J1cEhC3PsDyFW4hkvMRpdOoSlUfL2yVb1IxvbidcPF0ihtHgnMD2pn3W8xwFpbutpPWUgPd679Yq1C/bzFx2lIDWBpy5bSj/TpTWRsdFy7Z1Esja2ST8RfUByAl5zsg6fuyFFySzY8bVgH/Oc+eS82tICS1ZqdXJy6atsJQ2OnP7zTrw4Txz+vwpmQeddWSjL1wUs77ea0FJjU2MMFHm6+uW+cAr2woYlA4Lac6d+Mq9t5Ibt77J8BijkjJ+U79JhNSky0A2rSeThdWuD7uW/Kju43m6fb5ss/ATKbra/M3hUPg0F0YwtiDmPratCkE11uJnFfyYaPpt58LrgvYZzosliQe96AeCWru6IzEkGoGErSfl/PwielDWzDWXuNxY00gQ0Rtx3I76g6gV01gbxKcBusLTFh51GC0PvVEikhk5cI+drbT1uMDjLHi6Tr2MO+uRdu2BpwVQIZgSUke3OpnjQ2rDTIcaKy6e5lfJ7Hpw0kIw0Bi9j9YDMod90TRQXdElWFKeKQ+ZlaH9Ytr2FeDk+9H69kf52rXtn8q9Uy/NtlIdKsYa2pGdv7N1IFumGX+GbYplewTta/05OaJXI3iia1CV09oFryag+5MYQmJRCijSlUBIFjQ==
Thursday, 8 August 2019
X-Post - Use IBM Cloud Hyper Protect Crypto Services to encrypt VMware disks
One of my colleagues, Chris Poole, recently wrote this: -
Use IBM Cloud Hyper Protect Crypto Services to encrypt VMware disks
IBM Cloud offers integrated VMware solutions. Each virtual machine you stand up has storage coupled to it, which you may want to encrypt. These VMs may host applications and data that contain sensitive information, so you would need to lock it down.
You can encrypt this storage via highly secure, industry-standard algorithms. But this can lead to a key management concern: Where do you keep the keys, and how do you secure them? You can now configure a tight integration between IBM Cloud Hyper Protect Crypto Services (HPCS) and VMware on IBM Cloud. This tutorial shows you how to set this up to ensure that your most sensitive data is protected.
HPCS allows for secure key generation and storage, and takes advantage of an industry-leading hardware security module (HSM). This is the only public-cloud HSM that offers FIPS 140-2 level 4 data protection, which means that it’s highly tamper resistant. Store your keys here, and you can be sure that they’re kept safe from hackers — and even from IBM. No one but you can read them.
Down the rabbit hole with Docker and Kubernetes security
One of the many many fine podcasts to which I listen is The Kubernetes Podcast from Google.
A recent episode, Attacking and Defending Kubernetes, with Ian Coldwater, covered a lot of ground with regard to Docker/Kubernetes security, and led me to Ian's co-presentation from this year's BlackHat conference in Vegas: -
The Path Less Traveled: Abusing Kubernetes Defaults
Kubernetes is a container orchestration framework that is increasingly widely used in enterprise and elsewhere. While the industry is starting to pay some attention to Kubernetes security, there are many attack paths that aren’t well-documented, and are rarely discussed. This lack of information can make your clusters vulnerable.
as well as this: -
Understanding Docker container escapes
Definitely LOTS about which to think .....
PSA The podcast also mentioned some things upon which I'm working .... 😀
IBM and Red Hat:
OpenShift on IBM Cloud
OpenShift coming to Z Series and LinuxONE
Cloud Paks and services
Tuesday, 6 August 2019
SSH - Tinkering with the Known Hosts file
From the department of "I Did Not Know This" ....
Having been doing a LOT with SSH client/server connectivity this past few weeks, I'd seen a lot of this: -
@@@@@@@@@@@@@@@@@@@@@@@@@@@@@@@@@@@@@@@@@@@@@@@@@@@@@@@@@@@
@ WARNING: REMOTE HOST IDENTIFICATION HAS CHANGED! @
@@@@@@@@@@@@@@@@@@@@@@@@@@@@@@@@@@@@@@@@@@@@@@@@@@@@@@@@@@@
IT IS POSSIBLE THAT SOMEONE IS DOING SOMETHING NASTY!
Someone could be eavesdropping on you right now (man-in-the-middle attack)!
It is also possible that a host key has just been changed.
The fingerprint for the ECDSA key sent by the remote host is
SHA256:FX2S14zf+pJ1Ye6zzuXZ43EQzuIFNEkXiH/dg64yYhk.
Please contact your system administrator.
Add correct host key in /Users/hayd/.ssh/known_hosts to get rid of this message.
Offending ECDSA key in /Users/hayd/.ssh/known_hosts:1
ECDSA host key for 192.168.1.42 has changed and you have requested strict checking.
Host key verification failed.
mainly because I've been creating/deleting/recreating hosts ( containers running on IBM Z ) using the same IP address.
Each time I generate a new container, the unique private (host) key for the SSH daemon on the new container changes, which means that the above warning is back on ...
However, it's still a wrench to see "IT IS POSSIBLE THAT SOMEONE IS DOING SOMETHING NASTY!" each and every time.
My hacky solution was to: -
- Manually edit ~/.ssh/known_hosts each and every time ...
- Delete ~/.ssh/known_hosts which is somewhat nuclear
One of my colleagues gave me a MUCH better way ...
Use the ssh-keygen command to remove ONLY the "offending" host: -
ssh-keygen -f ~/.ssh/known_hosts -R 192.168.1.42
# Host 192.168.1.42 found: line 1
/Users/hayd/.ssh/known_hosts updated.
Original contents retained as /Users/hayd/.ssh/known_hosts.old
which is WAY better.
For background, here's the Man page: -
-R hostname | [hostname]:port
Removes all keys belonging to the specified hostname (with optional port number) from a known_hosts file. This option is useful to delete hashed hosts (see the -H option above).
Subscribe to:
Posts (Atom)
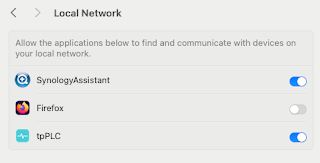
Note to self - Firefox and local connections
Whilst trying to hit my NAS from Firefox on my Mac, I kept seeing errors such as:- Unable to connect Firefox can’t establish a connection t...