Thursday, 7 June 2012

IBM Sametime Configuration Validator: now available for download

This from the Sametime Blog: -

I'm happy to let you guys know we have published a new tool designed to help expedite deployment of Sametime server components. The tool is called IBM Sametime Configuration Validator. It's an Eclipse-based tool that our support team developed initially for internal use and now, after some scrubbing and polishing, we're making it available to customers and business partners. Thanks to Jeff Miller and the rest of the team for such a good job.
 
IBM Sametime Configuration Validator does something very simple yet very useful. It harvests the entire configuration of a Sametime environment and validates the settings against a standard validation profile based on best practices and known settings. What it does is totally deterministic, i.e., total grunt work, and very powerful because now you don't have to do it manually.
 
The tool generates reports that tell you how the configuration stands against the standard profile and points out potential problems you may encounter. The report doesn't necessarily tell you that there's something wrong with your configuration. But, based on what's known to work, it'll tell you whether something may potentially go awry. That way you can nip any bad mojo in the bud and go back to relaxing.

as mentioned by @ICSEducation on Twitter.

The tool is available for download here.

Trying to find out what Mac OSX process is using a particular app

I was trying to remove / trash an app from my Mac ( Xcode.app for the record ), but Finder wasn't allowing me to empty the trash, telling me that something was using the app. even though I knew that it was not running.

To find out what, I put the app back into /Applications ( using the "Put Back" option in Finder / Trash, and then opened up a command prompt.

First I looked to see what was left in the Xcode app folder: -

$ find /Applications/Xcode.app/

/Applications/Xcode.app/
/Applications/Xcode.app//Contents
/Applications/Xcode.app//Contents/Resources
/Applications/Xcode.app//Contents/Resources/java-source_Icon.icns

Then I checked to see what was locking that one remaining file - java-source_lcon.icns: _

$ lsof /Applications/Xcode.app/Contents/Resources/java-source_Icon.icns 

COMMAND   PID      USER   FD   TYPE DEVICE SIZE/OFF     NODE NAME
SystemUIS 181 david_hay  txt    REG   14,2    44028 10107074 /Applications/Xcode.app/Contents/Resources/java-source_Icon.icns


Then I killed the process: -

$ kill -9 181

( which caused the OSX menu bar to restart )

Then I checked to see whether the lock had been released: -

lsof /Applications/Xcode.app/Contents/Resources/java-source_Icon.icns 

which reported nowt, nothing, nil, nada.

Then I trashed the app again.

Then I emptied the trash :-)

Job done !

More on automation - this time it's the DB2 UDB 9.7.0.2 fixpack ....

Following on from my earlier posts: -

Following the script - installing IBM DB2 UDB using a response file ( silent installation )
Validating a successful DB2 UDB installation

I've also run through the process to automate the deployment of the 9.7.0.2 fix pack ( other fix packs are available ).

Unpack the fixpack

$ mkdir /tmp/fixpack
$ cd /tmp/fixpack
$ tar xvzf ~/v9.7fp2_linuxx64_universal_fixpack.tar.gz

Check the installed level

$ /tmp/fixpack/universal/db2ls

Install Path                       Level   Fix Pack   Special Install Number   Install Date                  Installer UID
---------------------------------------------------------------------------------------------------------------------
/opt/ibm/db2/V9.7                 9.7.0.1        1                            Mon Jun  4 20:03:18 2012 BST             0

$ /opt/ibm/db2/V9.7/bin/db2level

DB21085I  Instance "db2inst1" uses "64" bits and DB2 code release "SQL09071"
with level identifier "08020107".
Informational tokens are "DB2 v9.7.0.1", "s091114", "IP23034", and Fix Pack
"1".
Product is installed at "/opt/ibm/db2/V9.7".


Install the fix pack

$ /tmp/fixpack/universal/installFixPack -b /opt/ibm/db2/V9.7

The execution completed successfully.

For more information see the DB2 installation log at

"/tmp/installFixPack.log.5821".

$ cat /tmp/installFixPack.log.5821

...
Updating DB2 file sets :.......Success
Setting DB2 library path :.......Success
Executing control tasks :.......Success
Updating global registry :.......Success
Starting DB2 Fault Monitor :.......Success
Updating the db2ls link :.......Success
Updating the DB2 Administration Server :.......Success
The instance "db2inst1" has been updated successfully.

The following instances were successfully updated:  db2inst1


Updating existing DB2 instances :.......Success

...

Check the installed level

$ /tmp/fixpack/universal/db2ls

Install Path                       Level   Fix Pack   Special Install Number   Install Date                  Installer UID
---------------------------------------------------------------------------------------------------------------------
/opt/ibm/db2/V9.7                 9.7.0.2        2                            Wed Jun  6 21:58:30 2012 BST             0

$ /opt/ibm/db2/V9.7/bin/db2level

DB21085I  Instance "db2inst1" uses "64" bits and DB2 code release "SQL09072"
with level identifier "08030107".
Informational tokens are "DB2 v9.7.0.2", "s100514", "IP23089", and Fix Pack
"2".
Product is installed at "/opt/ibm/db2/V9.7".


Monday, 4 June 2012

Validating a successful DB2 UDB installation

Hot on the heels of my last post - Following the script - installing IBM DB2 UDB using a response file ( silent installation ) - I thought I'd run through the steps to validate my installation: -

Check product levels

$ /opt/ibm/db2/V9.7/bin/db2level

DB21085I  Instance "db2inst1" uses "64" bits and DB2 code release "SQL09071"
with level identifier "08020107".
Informational tokens are "DB2 v9.7.0.1", "s091114", "IP23034", and Fix Pack
"1".
Product is installed at "/opt/ibm/db2/V9.7".


List instances

$ /opt/ibm/db2/V9.7/bin/db2ilist

db2inst1

Log in as the instance owner

$ su - db2inst1

Create a database

$ db2 create db test

SQL0970N  The system attempted to write to a read-only file.  SQLSTATE=55009

This looks familiar -

SQL0970N when running DB2SAMPL on Unix

Check /tmp permissions

$ ls -al /

...
drwxr-xr-x.  23 root root  4096 Jun  4 20:26 tmp
...

Add global write permissions to /tmp, recursively

$ chmod -R a+w /tmp/

Check /tmp permissions

$ ls -al /

...
drwxrwxrwx.  23 root root  4096 Jun  4 20:26 tmp
...

Create the database again

$ db2 create db test

DB20000I  The CREATE DATABASE command completed successfully.

Connect to our new database

$ db2 connect to test

   Database Connection Information

 Database server        = DB2/LINUXX8664 9.7.1
 SQL authorization ID   = DB2INST1
 Local database alias   = TEST


Create a table

$ db2 "create table loanrequests(name varchar(30) not null,custnum varchar(10) not null primary key,amount float not null)"

DB20000I  The SQL command completed successfully.


List the tables

$ db2 list tables

Table/View                      Schema          Type  Creation time            
------------------------------- --------------- ----- --------------------------
LOANREQUESTS                    DB2INST1        T     2012-06-04-20.44.44.189699

  1 record(s) selected.


Describe the table

$ db2 "describe select * from db2inst1.loanrequests"

 Column Information

 Number of columns: 3

 SQL type              Type length  Column name                     Name length
 --------------------  -----------  ------------------------------  -----------
 448   VARCHAR                  30  NAME                                      4
 448   VARCHAR                  10  CUSTNUM                                   7
 480   DOUBLE                    8  AMOUNT                                    6


Insert some data

$ db2 "insert into db2inst1.loanrequests values('Dave Hay','006734',12345.67)"

DB20000I  The SQL command completed successfully.

$ db2
"insert into db2inst1.loanrequests values('Homer Simpson','123456',456.78)"

DB20000I  The SQL command completed successfully.

$ db2
"insert into db2inst1.loanrequests values('Marge Simpson','661222',123.42)"

DB20000I  The SQL command completed successfully.

$ db2
"insert into db2inst1.loanrequests values('Lisa Simpson','123123',21323.23)"

DB20000I  The SQL command completed successfully.

$ db2 "insert into loanrequests values('Bart Simpson','43215',6651.21)"

DB20000I  The SQL command completed successfully.

Query the table

$ db2 "select * from db2inst1.loanrequests"

NAME                           CUSTNUM    AMOUNT                 
------------------------------ ---------- ------------------------
Dave Hay                       006734       +1.23456700000000E+004
Homer Simpson                  123456       +4.56780000000000E+002
Marge Simpson                  661222       +1.23420000000000E+002
Lisa Simpson                   123123       +2.13232300000000E+004
Bart Simpson                   43215        +6.65121000000000E+003

  5 record(s) selected.


Looking good :-)

Following the script - installing IBM DB2 UDB using a response file ( silent installation )

Right, the next instalment of the exciting series: -

Following the script - installing IBM HTTP Server using a response file ( silent installation )
Following the script - installing and using IBM WebSphere Update Installer using a response file ( silent installation )
Following the script - installing IBM Tivoli Directory Integrator using a response file ( silent installation )

is to install DB2 UDB 9.7 using a response file.

For some reason, DB2 doesn't ship with any sample response files on disk, so I needed to run through the GUI installation, and generate a response file. Thankfully, the GUI doesn't actually perform the installation, but merely generates the file - this is of use when installing onto multiple server nodes, especially where there's no GUI available.

So here is the response file in all its glory: -

LIC_AGREEMENT       = ACCEPT
PROD       = ENTERPRISE_SERVER_EDITION
FILE       = /opt/ibm/db2/V9.7
INSTALL_TYPE       = CUSTOM
COMP       = COMMUNICATION_SUPPORT_TCPIP
COMP       = JDK
COMP       = JAVA_SUPPORT
COMP       = BASE_DB2_ENGINE
COMP       = REPL_CLIENT
COMP       = LDAP_EXPLOITATION
COMP       = SQL_PROCEDURES
COMP       = DB2_DATA_SOURCE_SUPPORT
COMP       = BASE_CLIENT
COMP       = CONNECT_SUPPORT
DAS_CONTACT_LIST       = LOCAL
DAS_USERNAME       = dasusr1
DAS_GROUP_NAME       = dasadm1
DAS_HOME_DIRECTORY       = /home/dasusr1
DAS_PASSWORD       = 547728531534502455097246316284412703433439576433541379526367333363795314025447185737070
ENCRYPTED       = DAS_PASSWORD

INSTANCE       = inst1
inst1.TYPE       = ese
inst1.NAME       = db2inst1
inst1.GROUP_NAME       = db2iadm1
inst1.HOME_DIRECTORY       = /home/db2inst1
inst1.PASSWORD       = 547728531534502455097246316284412703433439576433541379526367333363795314025447185737070
ENCRYPTED       = inst1.PASSWORD
inst1.AUTOSTART       = YES
inst1.SVCENAME       = db2c_db2inst1
inst1.PORT_NUMBER       = 50000
inst1.FCM_PORT_NUMBER       = 60000
inst1.MAX_LOGICAL_NODES       = 4
inst1.CONFIGURE_TEXT_SEARCH       = NO
inst1.FENCED_USERNAME       = db2fenc1
inst1.FENCED_GROUP_NAME       = db2fadm1
inst1.FENCED_HOME_DIRECTORY       = /home/db2fenc1
inst1.FENCED_PASSWORD       = 560741752337471467346923905234405983312332393347245601931143497330598141735228590035459
ENCRYPTED       = inst1.FENCED_PASSWORD
LANG       = EN
INSTALL_TSAMP = NO


Note that the generated response file has encrypted passwords. To overcome this, we change the file as follows: -

LIC_AGREEMENT       = ACCEPT
PROD       = ENTERPRISE_SERVER_EDITION
FILE       = /opt/ibm/db2/V9.7
INSTALL_TYPE       = CUSTOM
COMP       = COMMUNICATION_SUPPORT_TCPIP
COMP       = JDK
COMP       = JAVA_SUPPORT
COMP       = BASE_DB2_ENGINE
COMP       = REPL_CLIENT
COMP       = LDAP_EXPLOITATION
COMP       = SQL_PROCEDURES
COMP       = DB2_DATA_SOURCE_SUPPORT
COMP       = BASE_CLIENT
COMP       = CONNECT_SUPPORT
DAS_CONTACT_LIST       = LOCAL
DAS_USERNAME       = dasusr1
DAS_GROUP_NAME       = dasadm1
DAS_HOME_DIRECTORY       = /home/dasusr1
DAS_PASSWORD       = passw0rd
INSTANCE       = inst1
inst1.TYPE       = ese
inst1.NAME       = db2inst1
inst1.GROUP_NAME       = db2iadm1
inst1.HOME_DIRECTORY       = /home/db2inst1
inst1.PASSWORD       = passw0rd
inst1.AUTOSTART       = YES
inst1.SVCENAME       = db2c_db2inst1
inst1.PORT_NUMBER       = 50000
inst1.FCM_PORT_NUMBER       = 60000
inst1.MAX_LOGICAL_NODES       = 4
inst1.CONFIGURE_TEXT_SEARCH       = NO
inst1.FENCED_USERNAME       = db2fenc1
inst1.FENCED_GROUP_NAME       = db2fadm1
inst1.FENCED_HOME_DIRECTORY       = /home/db2fenc1
inst1.FENCED_PASSWORD       = passw0rd
LANG       = EN
INSTALL_TSAMP = NO


In other words, we explicitly set the passwords, and remove the lines: _

ENCRYPTED       = inst1.PASSWORD
ENCRYPTED       = DAS_PASSWORD
ENCRYPTED       = inst1.FENCED_PASSWORD

(a) Unpack the product

$ cd /tmp
$ tar xvf /mnt/Products/DB297/db297linux64.tar

(b) Place the response file in a suitable location - I chose /root

(c) Install the product

$ cd /tmp/ese
$ ./db2setup -r /root/db2ese.rsp

(d) Wait a bit - my installation took ~22 minutes

DB2 Setup log file started at:  Mon Jun  4 19:52:43 2012 BST
DB2 Setup log file finished at:  Mon 04 Jun 2012 20:14:00 BST BST


(e) Check the log

$ cat /tmp/db2setup.log

...
Installing DB2 file sets :.......Success
Setting DB2 library path :.......Success
Executing control tasks :.......Success
Updating global registry :.......Success
The installation of IBM Tivoli Monitoring for Databases  has completed. The log
file can be found at /opt/ibm/db2/V9.7/itma/logs/itm_install.log.

Starting DB2 Fault Monitor :.......Success
Updating the db2ls link :.......Success
Registering DB2 licenses :.......Success
Setting default global profile registry variables :.......Success
Creating the DB2 Administration Server :.......Success
Initializing instance list :.......Success
Command to be run: "cd /opt/ibm/db2/V9.7/;/opt/ibm/db2/V9.7/instance/db2icrt -a server -s ese -u db2fenc1 -p db2c_db2inst1 db2inst1".
The instance "db2inst1" has been created successfully.

The value "SVCENAME=db2c_db2inst1" was set in the DBM CFG file for the
"db2inst1" instance.

The value "DB2AUTOSTART=YES" was set in the Profile Registry for the "db2inst1"
instance.

Configuring DB2 instances :.......Success
Configuring the DB2 Administration Server :.......Success
Updating global profile registry :.......Success
...

(f) Check the product's version

$ /opt/ibm/db2/V9.7/bin/db2level

DB21085I  Instance "db2inst1" uses "64" bits and DB2 code release "SQL09071"
with level identifier "08020107".
Informational tokens are "DB2 v9.7.0.1", "s091114", "IP23034", and Fix Pack
"1".
Product is installed at "/opt/ibm/db2/V9.7".

I'll cover the 9.7.0.2 fix pack installation at a later date, once I've downloaded the 600 MB file from here :-)


Following the script - installing IBM Tivoli Directory Integrator using a response file ( silent installation )

Following on from my previous posts: -

Following the script - installing IBM HTTP Server using a response file ( silent installation )
Following the script - installing and using IBM WebSphere Update Installer using a response file ( silent installation )

here's the next (hopefully) exciting instalment in the series, within which I intend to install all of the IBM Connections and IBM WebSphere Portal solution stack using command line, response files, scripts etc.

So, here we are with IBM Tivoli Directory Integrator (ITDI).

This is a fairly simple process - however, I did cheat initially; I used the GUI to record and create a response file, via the command line: -

$ ./install_tdiv70_linux_x86_64.bin -console -options-record /tmp/installer.properties

(a) Unpack the product ( I'm using the 64-bit version of ITDI to match my installation of Red Hat Enterprise Linux 6.2 )

- See this blog post - IBM Tivoli Directory Integrator - Which Version is Which ? - in order to work which version you have

$ cd /tmp
$ tar xvf /mnt/Products/TDI70/C1IU2ML.tar

(b) Create the response file

$ cd /tmp
$ vi installer.properties

-V TDI_Install_Current="true"
-V TDI_Add_Features="false"
-V TDI_Upgrade_Previous="false"
-V licenseAccepted=true
-P installLocation="/opt/IBM/TDI/V7.0"
-V IS_SELECTED_INSTALLATION_TYPE=custom
-P tdiServerFeature.active=true
-P tdiCEFeature.active=false
-P tdiCEUpdateSiteFeature.active=false
-P tdiJavadocsFeature.active=false
-P tdiExamplesFeature.active=false
-P tdiIEHSFeature.active=false
-P tdiLWIFeature.active=false
-P tdiAMCFeature.active=false
-V TDI_Soldir_UnderHome="false"
-V TDI_Soldir_InstallDir="false"
-V TDI_Soldir_SelectDir="false"
-V TDI_Soldir_Working="true"
-V TDI_Bundled_ISC_Chosen="false"
-V TDI_Custom_ISC_Chosen="false"
-V TDI_No_ISC_Chosen="false"
-V TDI_Migrate_Cloudscape="false"


- There's a couple of things to note here; I'm installing to the default location, I'm performing a custom install, and I am only installing the ITDI server
- Additionally, I'm going to use a working directory, rather than my home or installation directory, for the ITDI solution ( TDISOL )

(c) Perform the installation

$ cd /tmp
$ ./linux_x86_64/install_tdiv70_linux_x86_64.bin -options /tmp/installer.properties -silent

(d) Wait for a few minutes - 2.5 in my case

(e) Check the logs for completion

$ cat /tmp/tdiv70install.log

..
(04-Jun-2012 18:13:35), Install, com.ibm.eec.pit.ismp.product.actions.CreateLinuxShortcutAction, msg1, The Directory entry IBM Tivoli Directory Integrator v7.0 {2} was installed successfully.
(04-Jun-2012 18:13:36), Install, com.ibm.eec.pit.ismp.product.actions.CreateLinuxShortcutAction, msg1, The Application entry Uninstall IBM Tivoli Directory Integrator V7.0 was installed successfully.

...

(f) Validate the installation

$ /opt/IBM/TDI/V7.0/bin/applyUpdates.sh -queryreg

Information from .registry file in: /opt/IBM/TDI/V7.0
Edition: General Purpose
Level: 7.0.0.0
License: None

Fixes Applied
=-=-=-=-=-=-=
None

Components Installed
=-=-=-=-=-=-=-=-=-=
BASE
SERVER
PLUGINS


(g) Prepare for the 7.0.0.5 fix pack - this is the minimum level that IBM Connections 3.0.1 requires/supports

$ cp /mnt/Products/TDI70/7.0.0-TIV-TDI-FP0005.zip /tmp/
$ unzip -j 7.0.0-TIV-TDI-FP0005.zip 7.0.0-TIV-TDI-FP0005/TDI-7.0-FP0005.zip

(h) Replace the installed UpdateInstaller.jar with one shipped in the ZIP file

- I've blogged about this previously

$ mv /opt/IBM/TDI/V7.0/maintenance/UpdateInstaller.jar /opt/IBM/TDI/V7.0/maintenance/UpdateInstaller.jar.ORIGINAL
$ unzip -j 7.0.0-TIV-TDI-FP0005.zip 7.0.0-TIV-TDI-FP0005/UpdateInstaller.jar -d /opt/IBM/TDI/V7.0/maintenance/

Archive:  7.0.0-TIV-TDI-FP0005.zip
  inflating: /opt/IBM/TDI/V7.0/maintenance/UpdateInstaller.jar

- Note that the -d option specifies the target directory and the -j option tells unzip to ignore the path of the file within the ZIP file

(i) Install the fix pack

$ /opt/IBM/TDI/V7.0/bin/applyUpdates.sh -update /tmp/TDI-7.0-FP0005.zip

(j) Wait a while - 2.5 minutes

...
CTGDKO023I Applying fix 'TDI-7.0-FP0005' using backup directory '/opt/IBM/TDI/V7.0/maintenance/BACKUP/TDI-7.0-FP0005'.
CTGDKO027I Updating SERVER.
CTGDKO027I Updating PLUGINS.

...

(k) Check the current installed version

$ /opt/IBM/TDI/V7.0/bin/applyUpdates.sh -queryreg

Information from .registry file in: /opt/IBM/TDI/V7.0
Edition: General Purpose
Level: 7.0.0.5
License: None

Fixes Applied
=-=-=-=-=-=-=
TDI-7.0-FP0005(7.0.0.0)

Components Installed
=-=-=-=-=-=-=-=-=-=
BASE
SERVER
   -TDI-7.0-FP0005
PLUGINS
   -TDI-7.0-FP0005


Sorted.

Following the script - installing and using IBM WebSphere Update Installer using a response file ( silent installation )

Following on from my previous post, I'm intending to document all of the steps required to build out an IBM Connections or IBM WebSphere Portal infrastructure, using command line, shell scripts, response files etc.

So here goes the next step, installing the IBM WebSphere Update Installer ( required to patch IBM HTTP Server, WebSphere Plugin, WebSphere Application Server etc. ).

(a) Download the Update Installer - I'm using the current latest version 7.0.0.23 ( as of May 28, 2012 )

IBM Update Installer V7.0.0.23 for WebSphere Software for Linux

(b) Unpack the Update Installer

$ cd /tmp
$ tar xvzf /mnt/Products/Fixes/WAS7/7.0.0.23-WS-UPDI-LinuxAMD64.tar.gz

(c) Amend the response file: -

$ cd /tmp/UpdateInstaller
$ vi responsefile.updiinstaller.txt

-OPT silentInstallLicenseAcceptance="true"
-OPT disableOSPrereqChecking="false"
-OPT installLocation="/opt/IBM/WebSphere/UpdateInstaller"   


(d) Install the Update Installer

$ cd /tmp/UpdateInstaller
$ ./install -options /tmp/UpdateInstaller/responsefile.updiinstaller.txt -silent

(e) Wait a bit - just under two minutes in my case

(f) Check the logs for success

$ cat /opt/IBM/WebSphere/UpdateInstaller/logs/install/log.txt

...
(04-Jun-2012 15:20:33), Install, com.ibm.ws.install.ni.ismp.actions.SettleNIFRegistryAction, msg1, Current install/uninstall process is successful. Process type is: install
(04-Jun-2012 15:20:33), Install, com.ibm.ws.install.ni.ismp.actions.SetExitCodeAction, msg1, CWUPI0000I: EXITCODE=0
(04-Jun-2012 15:20:33), Install, com.ibm.ws.install.ni.ismp.actions.ISMPLogSuccessMessageAction, msg1, INSTCONFSUCCESS

...

(g) Prepare the required updates - I'm going to use 7.0.0.19

IBM HTTP Server                 -    7.0.0-WS-IHS-LinuxX64-FP0000019.pak
WebSphere Plugin                -    7.0.0-WS-PLG-LinuxX64-FP0000019.pak
WebSphere Application Server    -    7.0.0-WS-WAS-LinuxX64-FP0000019.pak
WebSphere Java SDK              -    7.0.0-WS-WASSDK-LinuxX64-FP0000019.pak

WebSphere Java SDK ( 32-bit )    -   7.0.0-WS-WASSDK-LinuxX32-FP0000019.pak

$ cd /opt/IBM/WebSphere/UpdateInstaller/maintenance/
$ cp /mnt/Products/Fixes/WAS7/*FP0000019.pak .

(h) Set up the response file - this time around I'm just going to install the IHS, Plugin and SDK fix packs for IBM HTTP Server

- This results in two response files; one for IHS, and one for the Plugin
- This is because the two components have different installation paths
- Also note that we're using the 32-bit SDK for IHS and the 64-bit SDK for the Plugin

$ cd /opt/IBM/WebSphere/UpdateInstaller/responsefiles
$ vi installIHSFixes.txt

-OPT checkFilePermissions="true"
-W maintenance.package="/opt/IBM/WebSphere/UpdateInstaller/maintenance/7.0.0-WS-IHS-LinuxX64-FP0000019.pak;/opt/IBM/WebSphere/UpdateInstaller/maintenance/7.0.0-WS-WASSDK-LinuxX32-FP0000019.pak"
-OPT disableNonBlockingPrereqChecking="true"
-W product.location="/opt/IBM/HTTPServer/"
-W update.type="install"


$ vi installPluginFix.txt

-OPT checkFilePermissions="true"
-W maintenance.package="/opt/IBM/WebSphere/UpdateInstaller/maintenance/7.0.0-WS-PLG-LinuxX64-FP0000019.pak;/opt/IBM/WebSphere/UpdateInstaller/maintenance/7.0.0-WS-WASSDK-LinuxX64-FP0000019.pak"
-OPT disableNonBlockingPrereqChecking="true"
-W product.location="/opt/IBM/HTTPServer/Plugins"
-W update.type="install"


(i) Check the currently installed versions: -

$ /opt/IBM/HTTPServer/bin/versionInfo.sh

...
Installed Product
--------------------------------------------------------------------------------
Name                     IBM HTTP Server
Version                  7.0.0.0
ID                       IHS
Build Level              sup0833.39
Build Date               8/20/08
Architecture             Intel (32 bit)

...

$ /opt/IBM/HTTPServer/Plugins/bin/versionInfo.sh

...
Installed Product
--------------------------------------------------------------------------------
Name                     Web server plug-ins for IBM WebSphere Application Server
Version                  7.0.0.0
ID                       PLG
Build Level              sup0833.39
Build Date               8/20/08

...

$ /opt/IBM/HTTPServer/java/jre/bin/java -version

java version "1.6.0"
Java(TM) SE Runtime Environment (build pxi3260sr2-20080818_01(SR2))
IBM J9 VM (build 2.4, J2RE 1.6.0 IBM J9 2.4 Linux x86-32 jvmxi3260-20080816_22093 (JIT enabled, AOT enabled)
J9VM - 20080816_022093_lHdSMr
JIT  - r9_20080721_1330ifx2
GC   - 20080724_AA)
JCL  - 20080808_02

$ /opt/IBM/HTTPServer/Plugins/java/jre/bin/java -version

java version "1.6.0"
Java(TM) SE Runtime Environment (build pxa6460sr2-20080818_01(SR2))
IBM J9 VM (build 2.4, J2RE 1.6.0 IBM J9 2.4 Linux amd64-64 jvmxa6460-20080816_22093 (JIT enabled, AOT enabled)
J9VM - 20080816_022093_LHdSMr
JIT  - r9_20080721_1330ifx2
GC   - 20080724_AA)
JCL  - 20080808_02

(j) Install the fix packs

IHS / SDK

$ cd /opt/IBM/WebSphere/UpdateInstaller
$ ./update.sh -options /opt/IBM/WebSphere/UpdateInstaller/responsefiles/installIHSFixes.txt -silent

Plugin

$ cd /opt/IBM/WebSphere/UpdateInstaller
$ ./update.sh -options /opt/IBM/WebSphere/UpdateInstaller/responsefiles/installPluginFix.txt -silent

(k) Wait a while - the two updates took about 4 minutes in total

(l) Check the logs: -

IHS

$ cat /opt/IBM/HTTPServer/logs/update/7.0.0-WS-IHS-LinuxX64-FP0000019.install/updatelog.txt

...
(04-Jun-2012 15:47:15), Install, com.ibm.ws.install.ni.ismp.actions.SettleNIFRegistryAction, msg1, Current install/uninstall process is successful. Process type is: maintenance
(04-Jun-2012 15:47:15), Install, com.ibm.ws.install.ni.ismp.actions.SetExitCodeAction, msg1, CWUPI0000I: EXITCODE=0
(04-Jun-2012 15:47:15), Install, com.ibm.ws.install.ni.ismp.actions.ISMPLogSuccessMessageAction, msg1, INSTCONFSUCCESS

...

SDK

$ cat /opt/IBM/HTTPServer/logs/update/install/updatelog.txt

...
(04-Jun-2012 16:57:20), Install, com.ibm.ws.install.ni.ismp.actions.SettleNIFRegistryAction, msg1, Current install/uninstall process is successful. Process type is: maintenance
(04-Jun-2012 16:57:20), Install, com.ibm.ws.install.ni.ismp.actions.SetExitCodeAction, msg1, CWUPI0000I: EXITCODE=0
(04-Jun-2012 16:57:20), Install, com.ibm.ws.install.ni.ismp.actions.ISMPLogSuccessMessageAction, msg1, INSTCONFSUCCESS

...

Plugin

$ cat /opt/IBM/HTTPServer/Plugins/logs/update/7.0.0-WS-PLG-LinuxX64-FP0000019.install/updatelog.txt

...
(04-Jun-2012 16:22:08), Install, com.ibm.ws.install.ni.ismp.actions.SettleNIFRegistryAction, msg1, Current install/uninstall process is successful. Process type is: maintenance
(04-Jun-2012 16:22:08), Install, com.ibm.ws.install.ni.ismp.actions.SetExitCodeAction, msg1, CWUPI0000I: EXITCODE=0
(04-Jun-2012 16:22:08), Install, com.ibm.ws.install.ni.ismp.actions.ISMPLogSuccessMessageAction, msg1, INSTCONFSUCCESS

...

Plugin SDK

$ cat /opt/IBM/HTTPServer/Plugins/logs/update/7.0.0-WS-WASSDK-LinuxX64-FP0000019.install/updatelog.txt
...
(04-Jun-2012 16:42:02), Install, com.ibm.ws.install.ni.ismp.actions.SettleNIFRegistryAction, msg1, Current install/uninstall process is successful. Process type is: maintenance
(04-Jun-2012 16:42:02), Install, com.ibm.ws.install.ni.ismp.actions.SetExitCodeAction, msg1, CWUPI0000I: EXITCODE=0
(04-Jun-2012 16:42:02), Install, com.ibm.ws.install.ni.ismp.actions.ISMPLogSuccessMessageAction, msg1, INSTCONFSUCCESS
...

(m) Check the versions now

$ /opt/IBM/HTTPServer/bin/versionInfo.sh

...
Installed Product
--------------------------------------------------------------------------------
Name                     IBM HTTP Server
Version                  7.0.0.19
ID                       IHS
Build Level              cf191132.09
Build Date               8/13/11
Architecture             Intel (32 bit)

...

$ /opt/IBM/HTTPServer/Plugins/bin/versionInfo.sh

...
Installed Product
--------------------------------------------------------------------------------
Name                     Web server plug-ins for IBM WebSphere Application Server
Version                  7.0.0.19
ID                       PLG
Build Level              cf191132.09
Build Date               8/13/11
Architecture             AMD (64 bit)

...

$ /opt/IBM/HTTPServer/java/jre/bin/java -version

java version "1.6.0"
Java(TM) SE Runtime Environment (build pxi3260sr9fp2ifix-20110727_01(SR9 FP2+IV03622))
IBM J9 VM (build 2.4, JRE 1.6.0 IBM J9 2.4 Linux x86-32 jvmxi3260sr9-20110712_86803 (JIT enabled, AOT enabled)
J9VM - 20110712_086803
JIT  - r9_20101028_17488ifx17
GC   - 20101027_AA)
JCL  - 20110727_04


$ /opt/IBM/HTTPServer/Plugins/java/jre/bin/java -version

java version "1.6.0"
Java(TM) SE Runtime Environment (build pxa6460sr9fp2ifix-20110727_01(SR9 FP2+IV03622))
IBM J9 VM (build 2.4, JRE 1.6.0 IBM J9 2.4 Linux amd64-64 jvmxa6460sr9-20110712_86803 (JIT enabled, AOT enabled)
J9VM - 20110712_086803
JIT  - r9_20101028_17488ifx17
GC   - 20101027_AA)
JCL  - 20110727_04


As ever, the job is a good 'un

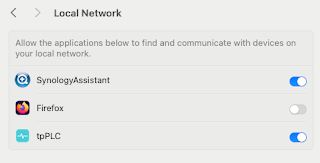
Note to self - Firefox and local connections

 Whilst trying to hit my NAS from Firefox on my Mac, I kept seeing errors such as:- Unable to connect Firefox can’t establish a connection t...