Wednesday, 30 March 2022

iTerm2 and keyboard navigation - Today I Learned

 I've been using iTerm2 off and on for a few years now, and find it especially useful when running live demos - one nice feature is that I can present multiple terminal windows in the same screen - windowed windows on a Mac 🤣

Right now, I'm using version 3.4.15 of iTerm, but that's not necessarily important right now.

The thing that was making me go "Hmmmm" was the "feature" that meant that I struggled to jump back along a line of commands using the [option] [arrow] keys ...

My muscle memory is that I can use that key combination to jump back and forth within a long list of commands on a single line to, for example, allow me to edit the command, add a switch etc.

By default, in iTerm, hitting [option] and [left-arrow] would, instead of jumping one word to the left ( as in the default macOS Terminal.app ) would instead append [D - which is a pain

So, here's an example: -

echo `date` && echo "Hello World" && echo "Dave"

I want to jump back to the second echo command, and change the greeting to "Hello World!".

Obviously, that's a very very trivial example, but the point remains the same ...

As ever, the internet helped - my Google Fu found this: -

Using Alt/Cmd + Right/Left Arrow in iTerm

which had a bunch of suggested solutions, the most simple of which was to simply append: -

bindkey "\e\e[D" backward-word
bindkey "\e\e[C" forward-word

to ~/.zshrc

Once I did this and restarted my shell ( I'm using Zsh obviously ), I was off to the races ....

For the record, I could've simply sourced in the updated ~/.zshrc via source ~/.zshrc


Grep AND awk

The context for this is that I'm working with the IBM Cloud CLI tool, specifically the Infrastructure Services plugin to find a specific subset of images, from which I can instantiate a Virtual Server Instrance (VSI).

Given this, I wanted to list the images in a specific region and filter by those that: -

- Run on the IBM Z Linux platform, aka s390x **AND**

- Are based upon Ubuntu **AND**

- Are available rather than deprecated

I started with this: -

ic is images

( where ic is an alias for the ibmcloud plugin )

and then filtered using a set of nested grep calls: -

ic is images | grep s390x | grep ubuntu | grep available

r134-0568bd44-e2b7-4876-bcbf-b74b244d3b66   ibm-ubuntu-18-04-1-minimal-s390x-2                 available    s390x   ubuntu-18-04-s390x                   18.04 LTS Bionic Beaver Minimal Install                      2               public       provider     none         -

r134-77d54c6d-5071-4729-ac79-a26c7404866a   ibm-ubuntu-18-04-6-minimal-s390x-3                 available    s390x   ubuntu-18-04-s390x                   18.04 LTS Bionic Beaver Minimal Install                      2               public       provider     none         -

r134-622ffa9c-47e1-450f-9a02-4f0567b7139f   ibm-ubuntu-20-04-2-minimal-s390x-2                 available    s390x   ubuntu-20-04-s390x                   20.04 LTS Focal Fossa Minimal Install                        2               public       provider     none         -

r134-323e4b0e-118b-4199-8d0b-745c05a75194   ibm-ubuntu-20-04-2-minimal-s390x-enclaved-2        available    s390x   ubuntu-20-04-s390x-enclaved          20.04 LTS Focal Fossa Minimal Install for Secure Execution   2               public       provider     none         -

but that's not very elegant

I knew how to use the OR operator in grep e.g.

ic is images | grep "s390x\|ubuntu"

but that's not what I want; I want AND rather that OR

This helped: -

How to run grep with multiple AND patterns?

In other words, use awk rather than grep, as per this: -

ic is images | awk '/s390x/ && /ubuntu/ && /available/'

r134-0568bd44-e2b7-4876-bcbf-b74b244d3b66   ibm-ubuntu-18-04-1-minimal-s390x-2                 available    s390x   ubuntu-18-04-s390x                   18.04 LTS Bionic Beaver Minimal Install                      2               public       provider     none         -

r134-77d54c6d-5071-4729-ac79-a26c7404866a   ibm-ubuntu-18-04-6-minimal-s390x-3                 available    s390x   ubuntu-18-04-s390x                   18.04 LTS Bionic Beaver Minimal Install                      2               public       provider     none         -

r134-622ffa9c-47e1-450f-9a02-4f0567b7139f   ibm-ubuntu-20-04-2-minimal-s390x-2                 available    s390x   ubuntu-20-04-s390x                   20.04 LTS Focal Fossa Minimal Install                        2               public       provider     none         -

r134-323e4b0e-118b-4199-8d0b-745c05a75194   ibm-ubuntu-20-04-2-minimal-s390x-enclaved-2        available    s390x   ubuntu-20-04-s390x-enclaved          20.04 LTS Focal Fossa Minimal Install for Secure Execution   2               public       provider     none         -

which is much better

Friday, 25 March 2022

Fun with Pip and Python on macOS 12.3 Monterey

I'm tinkering with a tool that uses pip and python, and was seeing: -

zsh: /usr/local/bin/pip: bad interpreter: /usr/bin/python: no such file or directory

repeatedly e.g.

pip --version                                                                                                                                                                           

zsh: /usr/local/bin/pip: bad interpreter: /usr/bin/python: no such file or directory

pip 22.0.4 from /Users/hayd/.pyenv/versions/3.10.0/lib/python3.10/site-packages/pip (python 3.10)

I've got Python 3.1 installed via Homebrew, using PyEnv: -

which python                                                                                                                                                                            

/Users/hayd/.pyenv/shims/python

python --version                                                                                                                                                                        

Python 3.10.0

as per an earlier post: -


I checked using brew doctor but nothing jumped off the page at me.

head -n1 /usr/local/bin/pip

#!/usr/bin/python

ls -al /usr/bin/python

ls: /usr/bin/python: No such file or directory

I then moved pip 

mv /usr/local/bin/pip /usr/local/bin/pip.old

and tested: -

which pip

/Users/hayd/.pyenv/shims/pip

and now we're happy: -

pip --version

pip 22.0.4 from /Users/hayd/.pyenv/versions/3.10.0/lib/python3.10/site-packages/pip (python 3.10)

So, in other words, in the pre-PyEnv days, I had pip pointing at the older Apple-supplied Python 2.7, which has long since been deprecated/removed.

Now, post the mv command, it's pointing at pip via PyEnv, which is nice.

Thanks, as ever, to StackOverflow: -


Wednesday, 23 March 2022

Running Podman on Ubuntu 18.04

 I'm leaving this to remind my future self ...

echo "deb https://download.opensuse.org/repositories/devel:/kubic:/libcontainers:/stable/xUbuntu_18.04/ /" | sudo tee /etc/apt/sources.list.d/devel:kubic:libcontainers:stable.list

curl -L "https://download.opensuse.org/repositories/devel:/kubic:/libcontainers:/stable/xUbuntu_18.04/Release.key" | sudo apt-key add -

sudo apt-get update

sudo apt-get -y upgrade

sudo apt-get install -y podman

podman run docker.io/docker/whalesay:latest cowsay Hello World!

when I want to install and test Podman on Ubuntu 18.04

Remembering that we'll end up with an older version of Podman ...

podman version

Version:      3.0.1
API Version:  3.0.0
Go Version:   go1.15.2
Built:        Thu Jan  1 00:00:00 1970
OS/Arch:      linux/amd64


Monday, 21 March 2022

Bash and history - where's it gone ?

I logged into an Ubuntu 18.04.6 LTS box and noticed that my Bash history was completely and utterly gone.

Having typed the command: -

history

I got absolutely nothing back.

Knowing that the command really just outputs the content of the ~/.bash_history file, I checked that out: -

ls -al ~/.bash_history

-rw------- 1 root root 9007 Mar 20 13:39 /home/hayd/.bash_history

Notice that my user name is hayd ....

Also notice the user/group ownership of the file .... root ....

I changed the ownership of the file: -

sudo chown hayd:hayd ~/.bash_history

[sudo] password for hayd: 

and logged out and back in again ...

And now I have my history back ...

...
  348  ~/upgrade.sh 
  349  which podman
  350  apt-get install -y podman
  351  ~/upgrade.sh 
  352  ~/createHelloWorld.sh 
  353  history 
  354  lsb_release -a
...

Also, as mentioned elsewhere, I use an alias - hist - to output history without line numbers: -

alias hist='history | cut -c 8-'

...
~/upgrade.sh 
which podman
apt-get install -y podman
~/upgrade.sh 
~/createHelloWorld.sh 
history 
lsb_release -a
...

Wednesday, 16 March 2022

ZSH and history - going back in time

OK, so this didn't take long to "fix" ...

As an ex-Bash user, I've had an alias setup on all my Unix boxen to allow me to list out my shell's history, without line numbers.

So, therefore, rather than typing: -

history

and seeing line numbers, such as these: -

  989  podman version
  990  cd
  991  hostname
  992  ls -al ~/.ssh
  993  ls -al ~/.ssh
  994  date
  995  cat ~/.ssh/readme.txt

I have an alias setup: -

hist='history | cut -c 8-'

which returns much the same but without line numbers e.g.

hostname
ls -al ~/.ssh
ls -al ~/.ssh
date
cat ~/.ssh/readme.txt

This alias was setup in ~/.bash_profile and is now set up in ~/.zshenv.

However, I'd noticed that hist would only ever return the last 16 commands ...

This was easily solved: -


...
History accepts a range in zsh entries as [first] [last] arguments, so to get them all run history 0.
...

Therefore, I just needed to update my alias: -

alias hist='history 0 | cut -c 8-'

and now I see everything.....

Podman say "No"

Whilst tinkering with podman today, I saw this: -

podman images

Cannot connect to Podman. Please verify your connection to the Linux system using `podman system connection list`, or try `podman machine init` and `podman machine start` to manage a new Linux VM

Error: unable to connect to Podman socket: server API version is too old. Client "4.0.0" server "3.4.4"

I tried: -

podman system connection list

which returned: -

Name                         URI                                                          Identity                                 Default

podman-machine-default       ssh://core@localhost:58173/run/user/1000/podman/podman.sock  /Users/hayd/.ssh/podman-machine-default  true

podman-machine-default-root  ssh://root@localhost:58173/run/podman/podman.sock            /Users/hayd/.ssh/podman-machine-default  false

which wasn't terribly useful, and then checked the machine: -

podman machine list

NAME                     VM TYPE     CREATED      LAST UP            CPUS        MEMORY      DISK SIZE

podman-machine-default*  qemu        2 weeks ago  Currently running  1           2.147GB     10.74GB

Having checked versions: -

podman --version

podman version 4.0.2

I tried restarting the machine: -

podman machine stop

Machine "podman-machine-default" stopped successfully

podman machine start

Starting machine "podman-machine-default"

INFO[0000] waiting for clients...                       

INFO[0000] new connection from  to /var/folders/b5/8vqr9tt54v94jxzs0_k2qq2m0000gn/T/podman/qemu_podman-machine-default.sock 

Waiting for VM ...

INFO[0012] Socket forward established: /Users/hayd/.local/share/containers/podman/machine/podman-machine-default/podman.sock to /run/user/0/podman/podman.sock 

ERRO[0013] Couldn't restablish ssh tunnel on path: /run/user/0/podman/podman.sock: ssh: rejected: connect failed (open failed) 

WARN[0013] API socket failed ping test                  


This machine is currently configured in rootless mode. If your containers

require root permissions (e.g. ports < 1024), or if you run into compatibility

issues with non-podman clients, you can switch using the following command: 


podman machine set --rootful


API forwarding listening on: /Users/hayd/.local/share/containers/podman/machine/podman-machine-default/podman.sock


The system helper service is not installed; the default Docker API socket

address can't be used by podman. If you would like to install it run the

following command:


sudo /usr/local/Cellar/podman/4.0.2/bin/podman-mac-helper install


You can still connect Docker API clients by setting DOCKER_HOST using the

following command in your terminal session:


export DOCKER_HOST='unix:///Users/hayd/.local/share/containers/podman/machine/podman-machine-default/podman.sock'


Machine "podman-machine-default" started successfully

but still saw the same issue: -

podman images

Cannot connect to Podman. Please verify your connection to the Linux system using `podman system connection list`, or try `podman machine init` and `podman machine start` to manage a new Linux VM

Error: unable to connect to Podman socket: server API version is too old. Client "4.0.0" server "3.4.4"

I've installed podman via Homebrew: -

brew info podman

podman: stable 4.0.2 (bottled), HEAD

Tool for managing OCI containers and pods

https://podman.io/

/usr/local/Cellar/podman/4.0.2 (172 files, 48.7MB) *

  Poured from bottle on 2022-03-15 at 12:23:57

From: https://github.com/Homebrew/homebrew-core/blob/HEAD/Formula/podman.rb

License: Apache-2.0

==> Dependencies

Build: go ✘, go-md2man ✘

Required: qemu ✔

==> Options

--HEAD

Install HEAD version

==> Caveats

zsh completions have been installed to:

  /usr/local/share/zsh/site-functions

==> Analytics

install: 10,898 (30 days), 36,534 (90 days), 104,199 (365 days)

install-on-request: 10,891 (30 days), 36,516 (90 days), 104,182 (365 days)

build-error: 13 (30 days)

Nothing was terribly informative, so I chose to nuke the machine: -

podman machine rm

The following files will be deleted:


/Users/hayd/.ssh/podman-machine-default

/Users/hayd/.ssh/podman-machine-default.pub

/Users/hayd/.config/containers/podman/machine/qemu/podman-machine-default.ign

/Users/hayd/.local/share/containers/podman/machine/qemu/podman-machine-default_fedora-coreos-35.20220213.2.0-qemu.x86_64.qcow2

/Users/hayd/.config/containers/podman/machine/qemu/podman-machine-default.json


Are you sure you want to continue? [y/N] y

and create a new one: -

podman machine init

Downloading VM image: fedora-coreos-35.20220305.dev.0-qemu.x86_64.qcow2.xz: done  

Extracting compressed file

Image resized.

Machine init complete

To start your machine run:


podman machine start

podman machine start

Starting machine "podman-machine-default"
INFO[0000] waiting for clients...                       
INFO[0000] new connection from  to /var/folders/b5/8vqr9tt54v94jxzs0_k2qq2m0000gn/T/podman/qemu_podman-machine-default.sock 
Waiting for VM ...
INFO[0018] Socket forward established: /Users/hayd/.local/share/containers/podman/machine/podman-machine-default/podman.sock to /run/user/501/podman/podman.sock 

This machine is currently configured in rootless mode. If your containers
require root permissions (e.g. ports < 1024), or if you run into compatibility
issues with non-podman clients, you can switch using the following command: 

podman machine set --rootful

API forwarding listening on: /Users/hayd/.local/share/containers/podman/machine/podman-machine-default/podman.sock

The system helper service is not installed; the default Docker API socket
address can't be used by podman. If you would like to install it run the
following command:

sudo /usr/local/Cellar/podman/4.0.2/bin/podman-mac-helper install

You can still connect Docker API clients by setting DOCKER_HOST using the
following command in your terminal session:

export DOCKER_HOST='unix:///Users/hayd/.local/share/containers/podman/machine/podman-machine-default/podman.sock'

Machine "podman-machine-default" started successfully

and then: -

podman images

REPOSITORY  TAG         IMAGE ID    CREATED     SIZE

which looked better.

I started a container: -

podman run -it alpine:latest sh

Resolved "alpine" as an alias (/etc/containers/registries.conf.d/000-shortnames.conf)
Trying to pull docker.io/library/alpine:latest...
Getting image source signatures
Copying blob sha256:59bf1c3509f33515622619af21ed55bbe26d24913cedbca106468a5fb37a50c3
Copying config sha256:c059bfaa849c4d8e4aecaeb3a10c2d9b3d85f5165c66ad3a4d937758128c4d18
Writing manifest to image destination
Storing signatures
/ # uname -a
Linux c4367a60c3d4 5.15.18-200.fc35.x86_64 #1 SMP Sat Jan 29 13:54:17 UTC 2022 x86_64 Linux
/ # exit

and then re-checked the downloaded images: -

podman images

REPOSITORY                TAG         IMAGE ID      CREATED       SIZE
docker.io/library/alpine  latest      c059bfaa849c  3 months ago  5.87 MB

podman version

Client:       Podman Engine
Version:      4.0.2
API Version:  4.0.2
Go Version:   go1.17.8

Built:      Wed Mar  2 14:04:36 2022
OS/Arch:    darwin/amd64

Server:       Podman Engine
Version:      4.0.2
API Version:  4.0.2
Go Version:   go1.16.14

Built:      Thu Mar  3 14:56:56 2022
OS/Arch:    linux/amd64
More fun with Git and ZSH, this time branch naming ...

Following on from my earlier post: -

ZSH and Git and auto-complete

I wanted to add the capability to display the name of the current GitHub repository branch in my Terminal.

Thankfully, GitHub already allows this, and I had their repository cloned to my Mac.

A quick update: -

cd ~/Documents/GitHub/github.com/git

git fetch origin

git rebase origin/master

and then I copied a pair of scripts: -

cp ~/Documents/GitHub/github.com/git/contrib/completion/git-completion.zsh ~/.zsh/_git

cp ~/Documents/GitHub/github.com/git/contrib/completion/git-prompt.sh ~

noting that git-completion.zsh goes into ~/.zsh/_git as per this: -

# The recommended way to install this script is to make a copy of it as a
# file named '_git' inside any directory in your fpath.
#
# For example, create a directory '~/.zsh/', copy this file to '~/.zsh/_git',
# and then add the following to your ~/.zshrc file:
#
#  fpath=(~/.zsh $fpath)

( source: git-completion.zsh )

This is now my ~/.zshrc file: -

if type brew &>/dev/null; then
    FPATH=$(brew --prefix)/share/zsh-completions:$FPATH

    autoload -Uz compinit
    compinit -u
fi

setopt prompt_subst
. ~/git-prompt.sh
export RPROMPT=$'$(__git_ps1 "%s")'

and, having restarted my Terminal, this is what I see: -


noting that the branch name appears/changes on the right-hand side of the screen

Which is nice

ZSH and Git and auto-complete

Having finally made the switch to ZSH ( zsh ) on my Mac a few weeks back ( yeah, I know, right ? ), I've been tinkering with auto-complete etc.

Lots of advice and guidance online, the simplest solution was to install zsh-completions, as I'm already using Homebrew: -

brew install zsh-completions

This, in part, said: -

To activate these completions, add the following to your .zshrc:

  if type brew &>/dev/null; then
    FPATH=$(brew --prefix)/share/zsh-completions:$FPATH

    autoload -Uz compinit
    compinit
  fi

You may also need to force rebuild `zcompdump`:

  rm -f ~/.zcompdump; compinit

Additionally, if you receive "zsh compinit: insecure directories" warnings when attempting
to load these completions, you may need to run this:

  chmod -R go-w '/usr/local/share/zsh'

Now I didn't read the last part ......

And then I noticed this: -

compinit
   
zsh compinit: insecure directories, run compaudit for list.
Ignore insecure directories and continue [y] or abort compinit [n]? y%                                                                                                                                                                 

A little digging later, I found compaudit, which reported: -

There are insecure directories:
/usr/local/share

and then I re-read the output from the brew command ...

Additionally, if you receive "zsh compinit: insecure directories" warnings when attempting
to load these completions, you may need to run this:

  chmod -R go-w '/usr/local/share/zsh'

but that made no difference - I still saw the same output from compaudit.

Eventually, I found this: -

compaudit | xargs chmod g-w

via this: -


TL;DR; this was the before state: -

ls -al /usr/local/share/zsh

total 0
drwxr-xr-x   3 hayd  admin    96 28 Jan  2019 .
drwxrwxr-x  36 hayd  admin  1152 16 Mar 09:55 ..
drwxr-xr-x  12 hayd  admin   384 15 Mar 12:23 site-functions

and this was the after state: -

ls -al /usr/local/share/zsh

total 0
drwxr-xr-x   3 hayd  admin    96 28 Jan  2019 .
drwxr-xr-x  36 hayd  admin  1152 16 Mar 09:55 ..
drwxr-xr-x  12 hayd  admin   384 15 Mar 12:23 site-functions

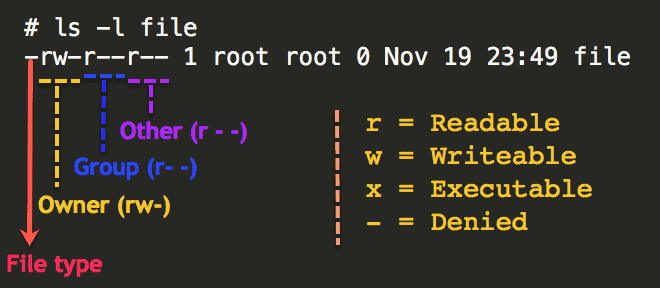
In other words, the chmod command removed the group-writeable permissions from the top-level directory - /usr/local/share

This was a good reminder of how one sees permissions using ls: -


Monday, 14 March 2022

Port Stripping

 So, like most things we do with tech, there's probably 73 different ways to achieve this particular requirement ...

However, I had a specific need to parse a JSON document, pull out a specific key, which contained an endpoint URL, and extract only the port number.

Here's an example of my JSON document: -

{

    "endpointURL":"https://www.ibm.com:443"

}

and, specifically, I just want to extract the port number of 443.

This is up with what I ended: -

cat server.json | jq -r '.endpointURL' | sed 's/.*://'

so it's three distinct commands, tied together with pipes: -

1. cat server.json to dump out the content of the document

2. jq -r '.endpointURL'  to only pull the endpointURL key

3. sed 's/.*://' to apply a regular expression ( aka RegExp ) to extract the port number

cat server.json | jq -r '.endpointURL' | sed 's/.*://'

443

Nice!

Monday, 7 March 2022

Ubuntu, where's my stuff ( in /tmp ) ?

At present, I'm tinkering with Kubernetes on Ubuntu 18.04.6 LTS, and had placed some "important" files in /tmp.

And then I rebooted ....

And, of course, /tmp was cleared ... 🙀🙀🙀🙀

This is, of course, configurable 

A quick Google took me here: -

How is the /tmp directory cleaned up?

TL;DR; there's a daemon for that: -

man tmpfiles.d

which includes: -

<snip>

       Example 3. Create a directory and prevent its contents from cleanup


       abrt(1), needs a directory created at boot with specific mode and ownership and its content should be preserved from the automatic cleanup applied to the

       contents of /var/tmp:


           # /usr/lib/tmpfiles.d/tmp.conf

           d /var/tmp 1777 root root 30d

</snip>

I tested this by creating the requisite file: -

vi /etc/tmpfiles.d/tmp.conf

containing: -

d /tmp 1777 root root 20d

and placed a dummy file in /tmp: -

touch /tmp/dave

and then rebooted.

And ... /tmp/dave is still there

Which is nice!

Tuesday, 1 March 2022

Go and GitHub and downstream dependencies

 I'm leaving this here to remind the future me ...

Along with: -

url.<base>.insteadOf

 which is better documented in git-config there's also a need to do something similar when using Go with dependencies in GitHub, namely the GOPRIVATE variable, which was added in Go 1.13 as per the release notes here.

This is to mitigate this exception: -

fatal: could not read Username for 'https://github.com': terminal prompts disabled

 Confirm the import path was entered correctly.

It's also well documented from the Go CLI as per the following: -

go help private

The go command defaults to downloading modules from the public Go module
mirror at proxy.golang.org. It also defaults to validating downloaded modules,
regardless of source, against the public Go checksum database at sum.golang.org.
These defaults work well for publicly available source code.
The GOPRIVATE environment variable controls which modules the go command
considers to be private (not available publicly) and should therefore not use
the proxy or checksum database. The variable is a comma-separated list of
glob patterns (in the syntax of Go's path.Match) of module path prefixes.
For example,
 GOPRIVATE=*.corp.example.com,rsc.io/private
causes the go command to treat as private any module with a path prefix
matching either pattern, including git.corp.example.com/xyzzy, rsc.io/private,
and rsc.io/private/quux.
For fine-grained control over module download and validation, the GONOPROXY
and GONOSUMDB environment variables accept the same kind of glob list
and override GOPRIVATE for the specific decision of whether to use the proxy
and checksum database, respectively.
For example, if a company ran a module proxy serving private modules,
users would configure go using:
 GOPRIVATE=*.corp.example.com
 GOPROXY=proxy.example.com
 GONOPROXY=none
The GOPRIVATE variable is also used to define the "public" and "private"
patterns for the GOVCS variable; see 'go help vcs'. For that usage,
GOPRIVATE applies even in GOPATH mode. In that case, it matches import paths
instead of module paths.
The 'go env -w' command (see 'go help env') can be used to set these variables
for future go command invocations.
For more details, see <https://golang.org/ref/mod#private-modules>.

TL;DR; this is what I needed to add: -

go env -w GOPRIVATE=github.com

More fun with variables and spaces, with added jq

Following on from my earlier post: -

Fun with variables and space

I thought I'd have a little fun using jq to achieve a similar outcome, but without the need to munge the output using sed.

This is with what I came up: -

export my_version=$(ic ks versions --output JSON | jq -j '.kubernetes[] | select(.minor | contains(23)) | .major,".",.minor,".",.patch')

which, you have to admit, is definitely NOT shorter than the alternative, but way more fun.

echo $my_version                                                                                                                        

1.23.4

echo $my_version | hexdump

0000000 31 2e 32 33 2e 34 0a                           
0000007

Fun with variables and space

Whilst doing some work with IBM Kubernetes Service (IKS), I wanted to define an environment variable containing a specific version of Kubernetes.

Having checked what's available: -

ic cs versions

OK

Kubernetes Versions   

1.19.16 (deprecated, unsupported in 13 days)   

1.20.15   

1.21.10   

1.22.7 (default)   

1.23.4   

1.24.0   


OpenShift Versions   

3.11.570_openshift (deprecated, unsupported in 96 days)   

4.6.48_openshift   

4.7.43_openshift   

4.8.31_openshift (default)   

4.9.21_openshift   

To assess the differences across versions, see 'https://ibm.biz/iks-versions'.

I was specifically interested in 1.23.4.

Reflecting the fact that the patch version ( .4 ) may well increment, I chose to define my variable thusly: -

export my_version=$(ic cs versions | grep 1.23)

which should mean that my variable contains 1.23.4 or, when it increments, 1.23.5 or 1.23.6 etc.

However, when I created my cluster using the IBM Cloud CLI via: -

ic cs cluster create vpc-gen2 ...

I saw: -

The requested container platform version is not available or not valid. (E0035)

I double-checked my variable: -

echo $my_version

1.23.4

which looked OK.

Then I dug deeper: -

echo $my_version | hexdump

0000000 31 2e 32 33 2e 34 20 20 20 0a
000000a

noting the additional 0x20 characters.

So, in other words, the command: -

ic cs versions | grep 1.23

is returning a couple of extra space characters.

This was easily fixed: -

export my_version=$(ic cs versions | grep 1.23 | sed 's: ::g')

which looks much better: -

echo $my_version | hexdump

0000000 31 2e 32 33 2e 34 0a                           
0000007

and, better still, my cluster creates OK

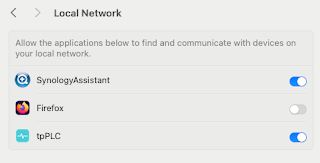
Note to self - Firefox and local connections

 Whilst trying to hit my NAS from Firefox on my Mac, I kept seeing errors such as:- Unable to connect Firefox can’t establish a connection t...