Saturday, 31 October 2020

Digging into certificate expiration using OpenSSL

This popped up on my Twitter feed earlier: -

Check the expiration date of an SSL or TLS certificate

and I thought it worth book marking ...

Checking the expiration of various certificates on my network ....

openssl s_client -servername 192.168.1.1 -connect 192.168.1.1:443 < /dev/null | openssl x509 -noout -dates

depth=0 C = TW, ST = HsinChu, L = HuKou, O = DrayTek Corp., OU = DrayTek Support, CN = Vigor Router

verify error:num=18:self signed certificate

verify return:1

depth=0 C = TW, ST = HsinChu, L = HuKou, O = DrayTek Corp., OU = DrayTek Support, CN = Vigor Router

verify return:1

poll errornotBefore=Aug 30 17:21:28 2020 GMT

notAfter=Sep 29 17:21:28 2021 GMT

openssl s_client -servername 192.168.1.12 -connect 192.168.1.12:443 < /dev/null | openssl x509 -noout -dates

depth=0 CN = HP3050A, L = Vancouver, ST = Washington, C = US, O = HP, OU = HP-IPG

verify error:num=20:unable to get local issuer certificate

verify return:1

depth=0 CN = HP3050A, L = Vancouver, ST = Washington, C = US, O = HP, OU = HP-IPG

verify error:num=21:unable to verify the first certificate

verify return:1

poll errornotBefore=Mar 16 06:51:44 2012 GMT

notAfter=Mar 11 06:51:44 2032 GMT

openssl s_client -servername nessus.local.com -connect nessus.local.com:8834 < /dev/null | openssl x509 -noout -dates

depth=0 O = Nessus Users United, OU = Nessus Server, L = New York, C = US, ST = NY, CN = nessus.local.com

verify error:num=20:unable to get local issuer certificate

verify return:1

depth=0 O = Nessus Users United, OU = Nessus Server, L = New York, C = US, ST = NY, CN = nessus.local.com

verify error:num=21:unable to verify the first certificate

verify return:1

poll errornotBefore=Oct  4 12:29:02 2019 GMT

notAfter=Oct  3 12:29:02 2023 GMT


Friday, 30 October 2020

Every Day Is A School Day - Changing metadata on movie files ...

As per my earlier post: -

Sharing media libraries between Apple Macs - d'oh, I'm holding it wrong

I'm continuing to tinker with my media library, sharing between macOS, iOS, iPadOS and tvOS ...

One thing that was niggling me was that I had a series of media files, in the MP4 v2 [ISO 14496-14] format, aka .m4v, for which the metadata appeared to be wrong ...

The symptom for this was that, when I imported the .m4v files into my library, via TV.app on the macOS box that's sharing the library - an Apple Mini, the name of the media item, as shown with TV.app ( on that Mac or any other  device ) did NOT match my expectations.

As an example, I have a bunch of files: -

ls -1 Dinnerladies\ Season\ 2\ Episode\ *

Dinnerladies Season 2 Episode 1 - Catering.m4v

Dinnerladies Season 2 Episode 10 - Toast.m4v

Dinnerladies Season 2 Episode 2 - Trouble.m4v

Dinnerladies Season 2 Episode 3 - Holidays.m4v

Dinnerladies Season 2 Episode 4 - Fog.m4v

Dinnerladies Season 2 Episode 5 - Gamble.m4v

Dinnerladies Season 2 Episode 6 - Christmas.m4v

Dinnerladies Season 2 Episode 7 - Minnellium.m4v

Dinnerladies Season 2 Episode 8 - Christine.m4v

Dinnerladies Season 2 Episode 9 - Gravy.m4v

where the file name reflects the season, episode and name.

However, the episode names, as shown in TV.app, never reflected the filename ...

I spent a happy hour or two deleting/reimporting, but never managed to resolve it ...

And then I realised where I was going wrong ...

The file name is NOT the same as the episode name ...

TL;DR; this is stored in the file's metadata, which is more than just the file name itself ...

This metadata is shown via the [cmd][i] key sequence in Finder, and includes: -

Last opened
Dimensions
Codec
Colour profile
Title
Duration
Audio Channels

Yes, you've guessed it ... the Title did NOT NOT NOT match the filename

So how to change it ?

Even though [cmd][i] exposes the information, one cannot change it ...

So what do to ?

After a spot o' Googling, I found that the VLC media player CAN edit this metadata

I downloaded and installed VLC on the Mac mini, and ran through the affected .m4v files, updating the Title to reflect the filename ....

Having done this, I re-imported the files into my library and all is now good .....

VLC is my friend ๐Ÿ‘๐Ÿ‘ง๐Ÿ‘ถ๐Ÿ˜Ž

Sharing media libraries between Apple Macs - d'oh, I'm holding it wrong

 So I've got a Mac Mini on my home network, acting ( in part ) as a media server, using Media Sharing ( enabled via System Preferences -> Sharing ).

This allows me to share my DVD library across my various Apple devices, including iOS, tvOS and ... macOS.

Having confirmed that I can see / play movies etc. from my iPad and from my Apple TV, I wasn't able to see the media from another Mac on the same LAN.

In both cases, the Macs are using the native TV.app - the Mac mini to manage the library and a MacBook Pro to consume the shared media .....

As ever, I was holding it wrong ...

In TV.app, there's a Library tab, but that was only showing my purchased media: -


The thing I'd missed was the twisty / pull-down under Library on the left-hand side of the app: -


That allowed me to choose the Mac Mini ( I could've also chosen my Synology NAS as that's also got the same iTunes / Media Serving capability ).

Once I did that, c'est voila : -


Thanks to this : -

Import media using Home Sharing in the Apple TV app on Mac

for helping me out of my own mess!

Saturday, 24 October 2020

Ubuntu upgrades - dealing with things that don't get upgraded

Doing an upgrade on an Ubuntu 18.04 boxen: - 

apt-get upgrade

...

Calculating upgrade... Done

The following packages were automatically installed and are no longer required:

  linux-headers-4.15.0-112 linux-headers-4.15.0-112-generic linux-image-4.15.0-112-generic linux-modules-4.15.0-112-generic linux-modules-extra-4.15.0-112-generic

Use 'apt autoremove' to remove them.

The following packages have been kept back:

  base-files libgl1-mesa-dri linux-generic linux-headers-generic linux-image-generic netplan.io ubuntu-server

0 upgraded, 0 newly installed, 0 to remove and 7 not upgraded.

...

I wondered how to handle the "kept back" warning ....

Wonder no more ....

apt-get --with-new-pkgs upgrade

...
Searching for splash image ... none found, skipping ...
Found kernel: /boot/vmlinuz-4.15.0-118-generic
Found kernel: /boot/vmlinuz-4.15.0-117-generic
Found kernel: /boot/vmlinuz-4.15.0-122-generic
Found kernel: /boot/vmlinuz-4.15.0-118-generic
Found kernel: /boot/vmlinuz-4.15.0-117-generic
Replacing config file /run/grub/menu.lst with new version
Updating /boot/grub/menu.lst ... done

/etc/kernel/postinst.d/zz-update-grub:
Sourcing file `/etc/default/grub'
Generating grub configuration file ...
Found linux image: /boot/vmlinuz-4.15.0-122-generic
Found initrd image: /boot/initrd.img-4.15.0-122-generic
Found linux image: /boot/vmlinuz-4.15.0-118-generic
Found initrd image: /boot/initrd.img-4.15.0-118-generic
Found linux image: /boot/vmlinuz-4.15.0-117-generic
Found initrd image: /boot/initrd.img-4.15.0-117-generic
done
Processing triggers for initramfs-tools (0.130ubuntu3.11) ...
update-initramfs: Generating /boot/initrd.img-4.15.0-122-generic
...

plus: -

apt autoremove

to get rid of any excess baggage.


Mitigating "SSL Medium Strength Cipher Suites Supported" warnings from Nessus scans

 It's been a while, but I'm back in the world of IBM Cloud Private (ICP), specifically mitigating a cipher warning message from a Nessus endpoint scan.

One of my z/Linux boxes, running Red Hat Enterprise Linux, threw up a warning: -

SSL Medium Strength Cipher Suites Supported 192.168.1.242:10259 / tcp

via a Nessus endpoint scan.

I used a simple piece of detective work to find out WHAT was listening on port 10259 : -

netstat -aonp|grep 10259

which returned: -

tcp6       0      0 :::10259                :::*                    LISTEN      45537/hyperkube      off (0.00/0/0)

and then used: -

ps auxw|grep 45537

to inspect the specific process ID ( PID ), which returned: -

root     45537  0.2  0.1 907488 61804 ?        Ssl  11:14   0:06 /hyperkube kube-scheduler --master=https://127.0.0.1:8001 --kubeconfig=/etc/cfc/conf/kube-scheduler-config.yaml --policy-config-file=/etc/cfc/conf/scheduler-policy-config.json --use-legacy-policy-config=true --v=2 --profiling=false --leader-elect=true

This confirmed that it was the kube-scheduler component of Kubernetes (K8s) - IBM Cloud Private is a distribution of K8s, as is Red Hat OpenShift Container Platform ( RHOCP ).

This K8s documentation: -

kube-scheduler

describes how the SSL/TLS ciphers for kube-scheduler can be modified using the --tls-cipher-suites switch.

This document: -

Modifying Cipher Suites used by Kubernetes in IBM Cloud Private

then describes the specifics for ICP, namely updating /etc/cfc/pods/master.json to include  --tls-cipher-suites for the scheduler Pod.

Once I backed up, and then edited, this file, the Pod was automatically restarted, and the Nessus scan ran cleanly.


Tuesday, 20 October 2020

macOS and the `networksetup` command - now I did not know that

Whilst providing some guidance to a colleague having fun with their Mac's DNS configuration, I "discovered" a new ( to me ) command - networksetup - which includes a HUGE array of useful commands: -

networksetup -listallnetworkservices

An asterisk (*) denotes that a network service is disabled.

USB 10/100/1000 LAN

Wi-Fi

Bluetooth PAN

Thunderbolt Bridge

networksetup -getdnsservers Wi-Fi

There aren't any DNS Servers set on Wi-Fi.

networksetup -getcomputername

Dave’s MacBook Pro

networksetup -getMTU Wi-Fi

Active MTU: 1500 (Current Setting: 1500)

networksetup -getinfo "USB 10/100/1000 LAN"

DHCP Configuration

IP address: 192.168.1.21

Subnet mask: 255.255.255.0

Router: 192.168.1.1

Client ID: 

IPv6: Automatic

IPv6 IP address: none

IPv6 Router: none

Ethernet Address: 00:a0:3c:37:02:42

etc.

The full list of sub-commands is here: -

networksetup -printcommands

networksetup -listnetworkserviceorder

networksetup -listallnetworkservices

networksetup -listallhardwareports

networksetup -detectnewhardware

networksetup -getmacaddress <hardwareport or device name>

networksetup -getcomputername

networksetup -setcomputername <name>

networksetup -getinfo <networkservice>

networksetup -setmanual <networkservice> <ip> <subnet> <router>

networksetup -setdhcp <networkservice> [clientid]

networksetup -setbootp <networkservice>

networksetup -setmanualwithdhcprouter <networkservice> <ip> 

networksetup -getadditionalroutes <networkservice>

networksetup -setadditionalroutes <networkservice> [ <dest> <mask> <gateway> ]*

networksetup -setv4off <networkservice>

networksetup -setv6off <networkservice>

networksetup -setv6automatic <networkservice>

networksetup -setv6LinkLocal <networkservice>

networksetup -setv6manual <networkservice> <networkservice> <address> <prefixlength> <router>

networksetup -getv6additionalroutes <networkservice>

networksetup -setv6additionalroutes <networkservice> [ <dest> <prefixlength> <gateway> ]*

networksetup -getdnsservers <networkservice>

networksetup -setdnsservers <networkservice> <dns1> [dns2] [...] 

networksetup -getsearchdomains <networkservice>

networksetup -setsearchdomains <networkservice> <domain1> [domain2] [...] 

networksetup -create6to4service <newnetworkservicename> 

networksetup -set6to4automatic <networkservice> 

networksetup -set6to4manual <networkservice> <relayaddress> 

networksetup -getftpproxy <networkservice>

networksetup -setftpproxy <networkservice> <domain> <port number> <authenticated> <username> <password>

networksetup -setftpproxystate <networkservice> <on off>

networksetup -getwebproxy <networkservice>

networksetup -setwebproxy <networkservice> <domain> <port number> <authenticated> <username> <password>

networksetup -setwebproxystate <networkservice> <on off>

networksetup -getsecurewebproxy <networkservice>

networksetup -setsecurewebproxy <networkservice> <domain> <port number> <authenticated> <username> <password>

networksetup -setsecurewebproxystate <networkservice> <on off>

networksetup -getstreamingproxy <networkservice>

networksetup -setstreamingproxy <networkservice> <domain> <port number> <authenticated> <username> <password>

networksetup -setstreamingproxystate <networkservice> <on off>

networksetup -getgopherproxy <networkservice>

networksetup -setgopherproxy <networkservice> <domain> <port number> <authenticated> <username> <password>

networksetup -setgopherproxystate <networkservice> <on off>

networksetup -getsocksfirewallproxy <networkservice>

networksetup -setsocksfirewallproxy <networkservice> <domain> <port number> <authenticated> <username> <password>

networksetup -setsocksfirewallproxystate <networkservice> <on off>

networksetup -getproxybypassdomains <networkservice>

networksetup -setproxybypassdomains <networkservice> <domain1> [domain2] [...] 

networksetup -getproxyautodiscovery <networkservice>

networksetup -setproxyautodiscovery <networkservice> <on off>

networksetup -getpassiveftp <networkservice>

networksetup -setpassiveftp <networkservice> <on off>

networksetup -getairportnetwork <device name>

networksetup -setairportnetwork <device name> <network> [password]

networksetup -getairportpower <device name>

networksetup -setairportpower <device name> <on off>

networksetup -listpreferredwirelessnetworks <device name>

networksetup -addpreferredwirelessnetworkatindex <device name> <network> <index> <security type> [password]

networksetup -removepreferredwirelessnetwork <device name> <network>

networksetup -removeallpreferredwirelessnetworks <device name>

networksetup -getnetworkserviceenabled <networkservice>

networksetup -setnetworkserviceenabled <networkservice> <on off>

networksetup -createnetworkservice <newnetworkservicename> <hardwareport>

networksetup -renamenetworkservice <networkservice> <newnetworkservicename>

networksetup -duplicatenetworkservice <networkservice> <newnetworkservicename>

networksetup -removenetworkservice <networkservice>

networksetup -ordernetworkservices <service1> <service2> <service3> <...>

networksetup -getMTU <hardwareport or device name>

networksetup -setMTU <hardwareport or device name> <value>

networksetup -listvalidMTUrange <hardwareport or device name>

networksetup -getmedia <hardwareport or device name>

networksetup -setmedia <hardwareport or device name> <subtype> [option1] [option2] [...]

networksetup -listvalidmedia <hardwareport or device name>

networksetup -createVLAN <VLAN name> <parent device name> <tag>

networksetup -deleteVLAN <VLAN name> <parent device name> <tag>

networksetup -listVLANs

networksetup -listdevicesthatsupportVLAN

networksetup -isBondSupported <hardwareport>

networksetup -createBond <bondname> <hardwareport1> <hardwareport2> <...>

networksetup -deleteBond <bonddevicename>

networksetup -addDeviceToBond <hardwareport> <bonddevicename>

networksetup -removeDeviceFromBond <hardwareport> <bonddevicename>

networksetup -listBonds

networksetup -showBondStatus <bonddevicename>

networksetup -listpppoeservices

networksetup -showpppoestatus <service name ie., MyPPPoEService>

networksetup -createpppoeservice <device name ie., en0> <service name> <account name> <password> [pppoe service name]

networksetup -deletepppoeservice <service name>

networksetup -setpppoeaccountname <service name> <account name>

networksetup -setpppoepassword <service name> <password>

networksetup -connectpppoeservice <service name>

networksetup -disconnectpppoeservice <service name>

networksetup -getcurrentlocation

networksetup -listlocations

networksetup -createlocation <location name> [populate]

networksetup -deletelocation <location name>

networksetup -switchtolocation <location name>

networksetup -listalluserprofiles

networksetup -listloginprofiles <service name>

networksetup -enablesystemprofile <service name> <on off>

networksetup -enableloginprofile <service name> <profile name> <on off>

networksetup -enableuserprofile <profile name> <on off>

networksetup -import8021xProfiles <service name> <file path>

networksetup -export8021xProfiles <service name> <file path> <yes no>

networksetup -export8021xUserProfiles <file path> <yes no>

networksetup -export8021xLoginProfiles <service name> <file path> <yes no>

networksetup -export8021xSystemProfile <service name> <file path> <yes no>

networksetup -settlsidentityonsystemprofile <service name> <file path> <passphrase>

>networksetup -settlsidentityonuserprofile <profile name> <file path> <passphrase>networksetup -deletesystemprofile <service name> 

networksetup -deleteloginprofile <service name> <profile name>

networksetup -deleteuserprofile <profile name>

networksetup -version

networksetup -help

networksetup -printcommands


Friday, 16 October 2020

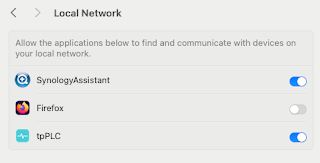
Note to self - Firefox and local connections

 Whilst trying to hit my NAS from Firefox on my Mac, I kept seeing errors such as:- Unable to connect Firefox can’t establish a connection t...